What Culture Stone Is and How We Supply It
Culture stone is a thin decorative wall veneer, also called stacked stone or ledgestone, made either from natural stone split into interlocking panels or from cement-based material moulded from real stone. We supply it as numbered panel sets for interior feature walls and exterior facades, quoted to importers, architects and project buyers by format, tone and fixing method.
Natural culture stone is cut from quartzite, slate, sandstone or marble into panels 1-2 inches thick. Manufactured culture stone uses cement, aggregates and iron oxide pigments moulded from real stone, and is typically 25-50% lighter than the natural equivalent. Both routes produce a textured wall; the choice turns on weight, cost, substrate and how much natural variation the project wants.
The eight panels in our range are supplied as individual codes rather than quarry names. The buying decision for a feature wall is driven by face texture, piece length, tone mix and corner detail, and those are properties a buyer can see and approve. We quote from a physical panel sample and a dry-lay record, not from a catalogue photograph. Tone, piece length and the proportion of face textures vary between production runs, so the approved sample and the batch reference travel with the order [source: stone-phoenix.com].
Natural and Manufactured Culture Stone Compared
Both products imitate dry-stacked masonry, and at a distance the difference is small. Up close, and in the substrate and fixing, they behave differently. The table sets out the comparison that matters to a procurement team.
| Question | Natural culture stone | Manufactured culture stone |
|---|---|---|
| Material | Quartzite, slate, sandstone or marble split into thin panels | Cement, aggregates and iron oxide pigments moulded from real stone |
| Thickness | 1-2 inches thick; thin veneer at 1"-1.5" | Moulded profile, normally consistent |
| Weight | Typical stacked panel 6-12 lbs/sq ft | Typically 25-50% lighter than natural stone equivalents |
| Substrate | Panels under 15 lbs/sq ft can go over drywall; heavier stone needs cement backer board | Often light enough for standard wall framing |
| Character | Split faces, batch variation, genuine mineral surface | Repeatable profile and controlled colour range |
| Typical fit | Projects where authenticity and natural variation lead | Large repetitive areas where weight and consistency lead |
Manufactured panels are usually priced below natural stone for the same coverage, but the comparison should include corners, fasteners and setting material rather than the face panel alone. Natural stone carries the cost of selection and waste: the pieces you reject at the dry-lay are part of the purchased area.
A natural thin veneer is real stone cut to 1"-1.5", far thinner and lighter than full-bed stone, which can be 3"-5" thick and needs structural support. Full-bed stone also costs 2-3x more than veneer. For most residential cladding and many commercial walls, veneer is the practical specification; where the wall must read as solid masonry, full-bed stone is the honest choice.
The Numbered Panel Range: What Each Code Describes
We describe these panels by form and tone because the codes are internal product references, not quarry names or geological classifications. These descriptions are visual summaries, not a material declaration. A project that needs a specific stone type should ask for the current sample, panel section and material statement in writing.
| Code | Form | Tone and surface | Typical application |
|---|---|---|---|
| New Cultural Stone 10 | Horizontal dry-stack strips of mixed length | Mid-grey split face with polished black accent strips | Modern media walls, reception fronts, bar facades |
| New Cultural Stone 11 | Mixed-length rectangular ledgestone | Warm grey-brown and tan, varied surface depth | Fireplace surrounds, exterior entries, garden walls |
| New Cultural Stone 18 | Tightly coursed ledgestone | Grey and white marbled face, medium relief | Living room walls, bathroom feature walls, chimney breasts |
| New Cultural Stone 22 | Horizontal ledger panels | Cream, ivory and gold tones with occasional ochre patches | Bathroom spa walls, kitchen backsplashes, luxury interiors |
| New Cultural Stone 26 | Fine horizontal strips | Light grey face with polished black accent rows | Minimalist feature walls, corridors, retail interiors |
| New Cultural Stone 38 | Irregular ashlar blocks | Sand and cream tones, some strongly banded pieces | Rustic fireplaces, exterior walls, columns |
| New Cultural Stone 40 | Ashlar blocks in mixed sizes | Warm beige and sand, earthy surface | Courtyard walls, garden features, traditional interiors |
| New Cultural Stone 44 | Rugged irregular blocks | Grey-green and brown mix, deep relief | Landscape walls, villa exteriors, textured facades |
The range divides by tone. Panels 10 and 26 read dark and architectural, with the polished strips giving a horizontal rhythm. Panels 11, 38, 40 and 44 sit in the warm neutral family, where split face and block relief carry the design. Panels 18 and 22 are lighter and more decorative, suited to calm, bright rooms rather than a dark accent.
Two practical points apply across the range. Mixed-length panels are packed and installed as a set, so an additional order from a different production run can change the tone mix. Polished accent strips also show handling marks more readily than split faces, so corner protection and careful crate opening matter.
Formats, Weights and Substrate Rules
Panel size and weight determine the substrate, the fixing method and the cost. They belong in the enquiry before the finish is chosen.
| Item | Specification | What it means on site |
|---|---|---|
| Panel face | 12"-24" wide and 4"-8" tall | Interlocking edges allow a dry-stack pattern |
| Typical panel weight | 6-12 lbs/sq ft | Suitable for many standard wall assemblies |
| Drywall limit | Up to 15 lbs/sq ft | Construction adhesive plus mechanical fasteners |
| Heavy cladding | Above 15 lbs/sq ft | Cement backer board or mortar scratch coat over metal lath |
| Full-thickness granite | Can exceed 30 lbs/sq ft | Structural support and engineered fixing |
| Interior stone cladding | 15–30 mm thick | Adhesive or mechanical fixing to a prepared wall |
| Exterior stone cladding | 30–50 mm thick | Mechanically anchored panels |
| Thin veneer | 1"-1.5" thick | Can be installed on standard framing |
| Full-bed stone | 3"-5" thick | Structural support, higher cost |
Substrate flatness matters as much as substrate strength. The wall should be flat within 3mm over 2m, because cladding follows the wall it is fixed to and cannot hide a hollow or a bow. A substrate that fails this check should be corrected before setting out, not packed out panel by panel.
Corner pieces should be ordered with the field panels. Most culture stone systems include purpose-made corners, and installing them first gives the field a fixed datum. Cutting field panels into corners is slower, produces a visible joint and wastes material.
Living Room and Media Feature Walls
The TV wall is the most common location for interior culture stone. A floor-to-ceiling stacked stone installation behind the television creates an anchoring focal point, and the irregular surface diffuses sound while hiding cables and cords. It also gives everything in front of it a deliberate backdrop.
Two design decisions should be settled early. The first is coverage. Extending the stone the full width of the room reads as architecture; a partial-width panel reads as a compromise, and the difference is visible in the finished room. The second is tone. Warm tones such as ivory, cream and sand suit traditional, cosy interiors; cool greys and charcoals suit modern minimalist rooms.
Lighting changes the result. Warm LED strip lighting along the top edge or inside a recessed alcove rakes across the split face after dark, and it makes a flat wall read as textured stone. The lighting detail should be drawn before the cladding is set out, because the recess has to exist in the substrate.
The television bracket and cable route belong in the same substrate plan. A concealed bracket fixed after cladding means drilling through the finished face. Set out the bracket positions, power outlet and cable conduit on the panel layout drawing, and confirm the fixings reach framing or a structural substrate rather than the cladding alone.
Fireplace Surrounds and Heat Clearances
A floor-to-ceiling stone fireplace surround turns a heat source into the emotional centre of a room, and firelight moving across a split face is the reason people specify it. The construction rules differ with the fire type.
For gas and electric fireplaces, stone can be installed tight to the firebox. For wood-burning fireplaces, maintain all required clearances to combustible materials according to local building code and use non-combustible cement backer board as the substrate. Natural stone is non-combustible and carries a Class A fire rating; for manufactured panels, ask for the product's fire test report. The fire risk in a wall assembly sits in the insulation and sealants around it, so those components need the same care as the stone.
Stone choice follows the fire and the room. Split-face quartzite gives dramatic texture and warm greys; black slate reads modern and hides soot; limestone gives a lighter, traditional European look; marble ledger panels suit a formal living room. Light stone near a wood fire will show soot over time, and a honed dark stone hides it better.
The chimney breast is usually the largest continuous stone surface in the house, so dry-lay it on the floor at full size with the corner pieces in position. Photograph the layout before the mortar is mixed and number the panels by position. On a tall surround, plan the sequence from the bottom up so the pattern does not drift out of level.
Kitchen, Bathroom and Entryway Walls
In kitchens and dining areas, stone adds warmth and texture without competing with cabinetry. Common placements are the wall behind a dining table, the island facing wall, a breakfast nook and the transition wall in an open-plan kitchen. The practical issue is grease and food splash: seal the stone with a matte-finish penetrating sealer, and choose a texture that can be wiped. A deeply relieved split face in a cooking zone collects aerosolised oil and is difficult to clean; a tighter ledger profile is easier to live with.
A bathroom stone wall behind a freestanding tub creates a spa effect, and white marble ledger panels are the most common choice for a clean, serene palette. The specification has to do more work here than in a dry room. The substrate needs a proper waterproofing membrane, not just moisture-resistant drywall, and wet areas should use epoxy-based setting materials for water resistance and bond strength. Seal the stone with a penetrating sealer suitable for wet areas, and accept that a sealed wall still needs prompt attention to splashes and regular cleaning.
Entryways and stair walls set the tone for the whole interior. Granite or quartzite cladding gives the durability needed on a high-touch vertical surface, and a honed finish hides scuffs from coats and bags better than a polished one. A backlit onyx panel creates a stronger arrival statement, but the lighting, substrate and access for future service all need to be designed together.
Commercial reception areas and home offices use the same logic at a larger scale. Stone feature walls project permanence, and the specification should account for impact, cleaning and the fixing of signage or screens. Where wall panels exceed 20mm or the wall is above 1.2m in height, mechanical fixing should be specified, and anything above one story should go to a structural engineer.
Exterior Facades and Rainscreen Systems
Exterior stone cladding is an engineered assembly, not a surface treatment. A ventilated rainscreen creates an air cavity of typically 25-50mm between the stone and the building's insulation and weather barrier. The cavity drains any water that passes the joints, ventilates residual moisture and improves thermal performance. Components include a stainless steel subframe, adjustable anchors, open or sealed joints and engineered drainage paths.
For exterior applications above ground floor level, mechanical attachment with stainless steel anchors and clips is mandatory in most jurisdictions. Adhesive-only installation is generally limited to low-height residential work. Thin veneer at 15-30mm can be adhesive-bonded to a suitable substrate up to 3-4m in height, with mechanical backup clips recommended even there. Above one story, a structural engineer should design the fixing.
Anchor systems include undercut anchors set into a groove at the panel edge, dowel and pin anchors in drilled holes, and bracket-and-clip systems. Each needs calculation for wind load, seismic zone, thermal expansion and panel dead weight. Anchor material should be 304 or 316 stainless steel; galvanised steel is not appropriate in coastal environments.
Material selection follows service conditions, not colour preference.
| Criterion | Target | Procurement note |
|---|---|---|
| Water absorption | Below 0.5% for freeze-thaw climates; below 0.3% is the tighter target for exposed facades | Test the batch, not a catalogue average |
| Compressive strength | Granite at 19,000+ psi; sandstone at 3,000-8,000 psi | Strength is not the only criterion |
| Flexural strength | Adequate for panel size under wind load (ASTM C880) | Larger panels need higher values |
| Anchor material | 304 or 316 stainless steel | Avoid galvanised steel near the coast |
| Rainscreen cavity | 25-50mm | Drain and ventilate the cavity |
| Exterior joint width | 5-10mm | Allow for thermal movement |
Granite and dense quartzite are the exterior workhorses. Marble is a poor exterior choice in acid rain and freeze-thaw conditions because of its calcite structure. Limestone needs a dry climate. Slate performs but has a limited colour range. Where the project is exposed and the material is not proven in that climate, the ASTM C1242 dimension stone selection guide is the professional reference.
Installation: Mortar, Joints and Sequence
The installation sequence is the same for interior and exterior work, but the materials and tolerances change. The first step is a dry layout on the floor: arrange the panels for balanced colour, plan the corner transitions and identify the pieces that need trimming. Take a reference photograph before mixing any mortar. This step costs an hour and prevents most of the visible failures.
Use polymer-modified thin-set mortar for most interior installations. Do not use mastic or construction adhesive as the setting material; the bond strength is insufficient for long-term performance. Apply mortar to both the wall and the back of each panel for full coverage. For panels with irregular backs, a medium-bed mortar helps achieve full coverage and proper support. Hollow spots are the leading installation defect.
Set the panels from the bottom up, checking level and plumb on every course. Interior joint widths are typically 2-3mm; exterior joints run 5-10mm to allow thermal movement. Use spacers rather than eye judgement, and check the course level before the mortar sets. Corner pieces go in first, then the field panels between them.
For exterior work, anchor each panel according to the engineering drawing, with undercut or dowel anchors at the specified positions and no fewer than four per panel. Joint treatment differs by system: interior joints can be grouted with a colour-matched grout or left open for a modern look; exterior sealed joints use a backer rod plus weatherproof silicone or polyurethane sealant; open joints are left open for rainscreen drainage.
Clean the joints and faces after installation, then seal interior stone and the top edges of exterior panels. Protect finished walls during the rest of construction. A stone wall that is damaged by other trades is an expensive repair, and replacement panels from a later production run may not match the original tone.
Sealing and Maintenance
Sealing is a maintenance decision, not a permanent treatment. Apply a penetrating sealer after the mortar has fully cured, which takes 48-72 hours minimum. The sealer slows absorption and makes cleaning easier; it does not make a calcium-based stone acid-resistant.
Interior cladding needs little routine work. Dust monthly, clean annually with a diluted pH-neutral stone cleaner, and reseal high-touch areas such as kitchen backsplashes and fireplace surrounds every 12-24 months. Wall cladding is sealed less often than a countertop because it sees less liquid, but a kitchen wall or a shower wall is a wet or greasy environment and should be treated as such.
Exterior cladding needs an annual inspection of joints and anchors, because the leading exterior failure is sealant and gasket degradation rather than the stone. Re-seal open joints every 5-10 years. Rinse facades in coastal or industrial areas to remove salt and pollution film, and check that weep holes and drainage paths are clear.
For cleaning, use water and a soft brush or a pH-neutral stone cleaner. Avoid pressure washing above 1500 PSI, and do not acid-wash stone; hydrochloric acid is sold for masonry cleaning but attacks calcite stone. Chipped or cracked panels can be repaired with colour-matched resin or replaced individually, which is straightforward on a mechanical anchor system if spare panels were ordered with the project.
Stone Cladding Costs for Importers
Cladding cost has two numbers that are often confused: the material price per square foot and the installed price per square foot. A supplier quotation covers the first; a project budget needs the second. The table is a planning range, not a quotation for a specific project.
| Cladding type | Material (per sq ft) | Installed (per sq ft) | Typical application |
|---|---|---|---|
| Culture stone / stacked stone panels | $8-$18 | $15-$30 | Interior accent walls, fireplaces |
| Natural thin veneer (1-1.5 inch) | $6-$15 | $12-$28 | Exterior facades, garden walls |
| Sandstone cladding panels | $15-$35 | $25-$60 | Warm-toned exteriors |
| Granite cladding panels | $15-$40 | $30-$80 | Commercial lobbies, prestige facades |
| Marble cladding panels | $20-$60 | $40-$100+ | Luxury hotel lobbies, retail |
| Book-matched premium marble | $40-$150+ | $80-$200+ | Statement walls, reception areas |
| Backlit onyx panels | $60-$200+ | $150-$350+ | Signature luxury feature walls |
Installation cost depends on the method. Adhesive interior work runs $12-30/sq ft; mechanically anchored exterior systems run $25-60/sq ft depending on height and complexity. Mechanical anchoring adds $10-25/sq ft for exterior work. On premium stone, installation can cost more than the material, which is why factory-fabricated panel systems that reduce site work are growing in commercial use.
For B2B buyers sourcing from China, FOB pricing for cladding panels runs 30-50% below domestic wholesale. Marble panels start around $20-60/m² FOB and granite around $15-40/m², with book-matching and custom finishes available at the factory. FOB is not the landed number: freight, duty, port charges and inland delivery sit on top.
The cost drivers are stone type, panel size, finish, installation method and height. Stone type dominates. Large-format panels cost more to fabricate and handle, and polished finishes and book-matching add processing cost. Multi-story work adds scaffolding and engineering. Fixing the panel size and fixing method early gives the factory enough information to quote a number that will hold.
What to Write Into the Purchase Order
A cladding order should describe the product in terms that can be measured and inspected. The trade name is not enough, particularly where a panel is chosen for appearance.
| Clause | What to write |
|---|---|
| Product and code | Panel code, face form, tone range and reference sample number |
| Material | Natural or manufactured; if natural, the stone type stated by the supplier |
| Dimensions | Panel face, piece lengths supplied, corner piece dimensions |
| Thickness and tolerance | Interior cladding 15–30 mm; exterior 30–50 mm; stated tolerance and measuring points |
| Finish | Split face, honed, polished or brushed; approved sample retained by both parties |
| Quantity | Net area by panel type, plus spare panels and corner pieces |
| Fixing | Adhesive or mechanical; anchor type, material and positions for exterior work |
| Absorption and strength | Batch test results for exterior work; target below 0.5% for freeze-thaw, below 0.3% where specified |
| Joints | Interior 2-3mm; exterior 5-10mm; sealant type and colour |
| Packing | Crates, interleaving, edge protection, panel numbering and layout drawing |
| Inspection | Third-party inspection before loading for container orders; report sent to the buyer |
| Change control | Any change of panel, batch or finish requires a new sample and written approval |
Two clauses cause most disputes. The first is tone. A photograph cannot define a natural stone colour range, so the approved sample should be physical, dated and retained by both parties. The second is quantity. Order spare panels with the main order; a repair years later needs material from the same production run.
For EU projects, CE marking and a Declaration of Performance belong in the documentation. For US projects, the structural and flexural test reports for the specified panel system belong in the submittal package. State which documents are required, and who pays for the testing.
Packing, Inspection and Project Records
Packing is part of the specification because stone arrives heavy, with edges and a surface that shows damage. Crates should be built for the panel format, with edge protection, separation between panels and a moisture barrier. Number panels by installation position and pack them in the order the site will use them.
Inspection is both documentary and physical. Check the panel count and area against the packing list, compare the face against the retained sample under the project lighting, and check for cracks, chips, repairs and inconsistent tone. Measure thickness at the edge and at the centre. For exterior orders, confirm the anchor specification and that the batch test results describe the delivered material.
The same discipline applies to larger cladding projects. In a published case study, a six-story Berlin office lobby required 4,200 m² of granite facade cladding and 1,500 m² of lobby flooring, with full CE marking compliance. The facade used 30mm G654 granite panels on a ventilated rainscreen with undercut anchors and sealed joints. Every panel was CE-marked with a Declaration of Performance, batch-tested for flexural strength and numbered for installation sequence; more than 5,800 precision-cut panels were installed without site cutting. The factory-fabricated, numbered set turned site installation into a placement exercise rather than a fabrication exercise [source: stone-phoenix.com].
For a culture stone order, the equivalent controls are simpler: a sealed sample, a numbered dry-lay, a panel layout drawing, corner pieces packed with the field, and photographs of the packed crates before loading. Those records support a claim if the delivered tone or quantity does not match.
Frequently Asked Questions
What is culture stone?
Culture stone is a thin wall cladding that imitates traditional dry-stacked masonry. It is made either from natural stone split into interlocking panels, typically 1-2 inches thick, or from cement, aggregates and pigments moulded from real stone. It is used on interior feature walls and exterior facades and fixed with adhesive, mechanical anchors or both.
Is natural or manufactured culture stone better for my project?
Neither is universally better. Natural stone gives genuine split faces and batch variation, and a typical panel weighs 6-12 lbs/sq ft. Manufactured stone is typically 25-50% lighter, which can simplify the substrate, and it gives repeatable colour. Choose natural where authenticity and variation are part of the design; choose manufactured where weight and consistency lead.
What panel sizes and thicknesses do you supply?
The panels in our range are typically 12"-24" wide and 4"-8" tall, with interlocking edges. Natural culture stone is 1-2 inches thick, and thin veneer is 1"-1.5". Interior stone cladding is normally 15–30 mm; exterior cladding is 30–50 mm.
Can culture stone be installed over drywall?
Panels under 15 lbs/sq ft can be installed over drywall with construction adhesive and mechanical fasteners, provided the drywall is structurally sound. Heavier stone requires cement backer board or a mortar scratch coat over metal lath. Do not install heavy stone directly on standard drywall.
Where can culture stone be used indoors?
Common locations are living room media walls, fireplace surrounds, kitchen and dining accent walls, bathroom feature walls, entryways, stair walls and commercial reception areas. Kitchens and bathrooms need a penetrating sealer, and wet areas need a waterproofing membrane and epoxy-based setting materials.
How is culture stone fixed on an exterior facade?
Exterior work is a rainscreen assembly. The stone is mechanically anchored to a stainless steel subframe, with a ventilated cavity of typically 25-50mm behind it for drainage and drying. Anchors should be 304 or 316 stainless steel. Adhesive-only fixing is limited to low-height residential work, and anything above one story should be engineered.
How do you control tone and batch consistency?
We approve a physical sample and retain it, lay out the panels dry and photograph the layout before packing. Panels are numbered by installation position, and the batch reference is recorded on the packing list. Natural stone varies between production runs, so order spare panels with the main order.
What does culture stone cost?
As a planning range, culture stone and stacked stone panels cost $8-$18/sq ft for the material and $15-$30/sq ft installed. Natural thin veneer runs $6-$15/sq ft material and $12-$28/sq ft installed. Granite and marble cladding sit higher, at $15-$40 and $20-$60/sq ft material respectively. FOB China pricing for cladding panels is typically 30-50% below domestic wholesale.
How do you maintain and seal a culture stone wall?
Apply a penetrating sealer after the mortar has cured for 48-72 hours minimum. Indoors, dust monthly, clean annually with a pH-neutral cleaner and reseal high-touch areas every 12-24 months. Outdoors, inspect joints and anchors annually and reseal open joints every 5-10 years. Avoid pressure washing above 1500 PSI and do not acid-wash the stone.
Can culture stone be used around a wood-burning fireplace?
Yes, with the right construction. Use non-combustible cement backer board as the substrate and maintain all required clearances to combustible materials according to local building code. Natural stone is non-combustible with a Class A fire rating, but the insulation and sealants also need to be specified.
Related Guides
- Stone Wall Cladding Design Guide — interior and exterior systems, fixing methods, costs and detailing.
- Culture Stone and Stacked Stone Interior Design Guide — room-by-room applications, installation essentials and sealing.
- Stone Finishes Comparison — how split face, honed, polished and textured surfaces differ in use.
- Stone Installation Mistakes to Avoid — substrate, setting and sequencing errors that show up after handover.
- Stone Maintenance Complete Guide — cleaning, sealing schedules and repair procedures.
Product Gallery

New Cultural Stone 18

New Cultural Stone 22

New Cultural Stone 38

New Cultural Stone 40

New Cultural Stone 11

New Cultural Stone 26

New Cultural Stone 10

New Cultural Stone 44

New Cultural Stone 33

New Cultural Stone 14

New Cultural Stone 19

New Cultural Stone 16

New Cultural Stone 20

New Cultural Stone 23

New Cultural Stone 24

New Cultural Stone 8

New Cultural Stone 15
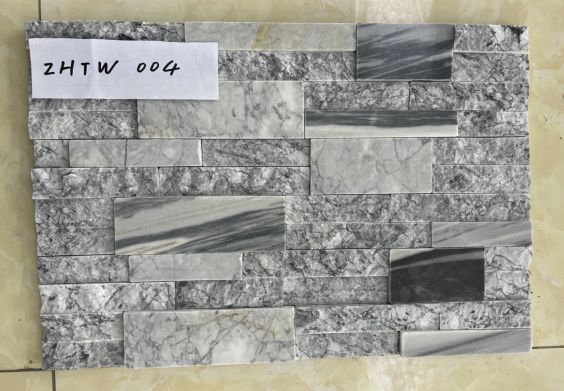
New Cultural Stone 5

New Cultural Stone 32

New Cultural Stone 3

New Cultural Stone 27

New Cultural Stone 31

New Cultural Stone 28

New Cultural Stone 36

New Cultural Stone 43 1

New Cultural Stone 41

New Cultural Stone 7

New Cultural Stone 13

New Cultural Stone 30

New Cultural Stone 34