Why Natural Stone Paving?
Natural stone paving refers to cut and finished stone units — typically granite, sandstone, limestone, or slate — installed as outdoor walking surfaces for patios, driveways, walkways, and public plazas. Unlike manufactured concrete pavers, natural stone paving offers unique color and texture variations, 50+ year durability, freeze-thaw resistance (when properly specified), and a premium aesthetic that manufactured alternatives cannot replicate.
★ Key Takeaways
- The most popular natural stone patio pattern. A mix of different-sized rectangular slabs (typically 4 sizes: 600×900mm, 600×600mm, 600×300mm, 300×300mm) are laid in a seemingly random but carefully planned pattern. This creates a natural, organic loo
- Driveways demand the most from paving materials: vehicle weight, turning forces, oil and fluid leaks, and year-round weather exposure. For natural stone driveways, granite setts are the professional choice. Their exceptional compressive strength (19,
- Professional stone installers will tell you: the stone is only as good as what's underneath it. The base is 80% of the job. Here's the non-negotiable formula for a permanent natural stone paving installation:
Best Stone for Paving: Complete Comparison
| Stone Type | Best For | Material Cost/sq ft | Durability | Slip Resistance | Freeze-Thaw Rating |
|---|---|---|---|---|---|
| Granite Setts/Cubes | Driveways, high-traffic paths | $6-$15 | Excellent | Good (flamed) | Excellent |
| Sandstone (Indian Stone) | Patios, garden paths | $3-$8 | Good | Excellent (natural riven) | Good |
| Bluestone | Patios, pool surrounds | $5-$12 | Very Good | Good | Excellent |
| Slate | Patios, walkways | $3-$9 | Good | Excellent | Good (can delaminate) |
| Limestone | Patios (sheltered) | $4-$10 | Fair | Good (honed) | Poor to Fair |
| Travertine | Pool decks, patios | $5-$12 | Fair to Good | Excellent (tumbled) | Poor (needs sealing) |
| Porcelain (for comparison) | Patios, modern designs | $5-$10 | Excellent | Variable | Excellent |
Patio Design Ideas
A well-installed natural stone patio lasts generations. The base preparation makes all the difference.
Classic Random Rectangular (Indian Stone Pattern)
The most popular natural stone patio pattern. A mix of different-sized rectangular slabs (typically 4 sizes: 600×900mm, 600×600mm, 600×300mm, 300×300mm) are laid in a seemingly random but carefully planned pattern. This creates a natural, organic look that works with both traditional and contemporary homes. The varied joint lines add visual interest while the rectangular format keeps installation manageable.
Circular Feature
A circular stone patio or central medallion creates a dramatic focal point. Traditionally executed in granite setts radiating from a central stone, circular features define outdoor dining areas, fire pit surrounds, or entry courtyards. Requires skilled installation but delivers showstopping results.
Mixed Material Borders
Combine two stone types for visual distinction: granite setts forming a border around sandstone paving, or slate insets within a limestone field. Borders define zones (dining vs. lounging) and add architectural structure to larger patio spaces.
Stepping Stone Pathways
Individual large flagstones set into gravel or grass create informal, natural-looking paths through gardens. Space the stones at a comfortable walking stride (24"-28" center-to-center). Use irregular natural edge stones for the most organic appearance.
Driveway Paving Guide
Driveways demand the most from paving materials: vehicle weight, turning forces, oil and fluid leaks, and year-round weather exposure. For natural stone driveways, granite setts are the professional choice. Their exceptional compressive strength (19,000+ psi), near-zero water absorption, and proven freeze-thaw performance make them the reference standard for vehicular paving.
Driveway-Specific Requirements
- Thickness: Minimum 2-3/8" (60mm) for cars/SUVs; 3-1/8" (80mm) for occasional trucks; 4"+ (100mm+) for commercial/heavy vehicle use
- Base depth: Minimum 8" compacted angular crushed stone for residential driveways; 12"+ for commercial or heavy clay soils
- Joint width: 8-15mm joints filled with kiln-dried sand or permeable jointing compound
- Edge restraint: Concrete haunching or heavy-duty metal edging is mandatory — vehicles push paving outward over time without proper edge restraint
- Drainage: Slope minimum 1/4" per foot away from structures; permeable designs may require additional sub-base depth
The Critical Importance of Base Preparation
Professional stone installers will tell you: the stone is only as good as what's underneath it. The base is 80% of the job. Here's the non-negotiable formula for a permanent natural stone paving installation:
- Excavation: Dig to the required depth (paving thickness + sand layer + sub-base depth). Remove all topsoil and organic material — it will decompose and cause settlement.
- Geotextile fabric: Place non-woven geotextile fabric directly on the excavated subgrade. This prevents the stone sub-base from mixing with the soil below — the #1 cause of paving failure in clay soils.
- Sub-base: Add angular crushed stone (3/4" minus or MOT Type 1) in 2" lifts, compacting each lift thoroughly with a vibrating plate compactor. Never use pea gravel or rounded stone — they don't interlock.
- Bedding layer: 1" of sharp sand or stone dust, screeded level. This layer is for precise leveling only — structural support comes from the sub-base.
- Laying: Place each stone, tap down with a rubber mallet, check for level and slope. Cut edges as needed with a diamond blade saw or stone splitter.
- Jointing: Sweep kiln-dried sand or polymeric jointing sand into joints. For driveways, use a resin-based jointing compound for maximum durability.
- Compaction: Run the plate compactor over the completed surface (with a rubber mat to prevent scratching) to settle stones into the bedding layer.
Further Reading
Related articles: Marble Tiles: Complete Selection, Installation & MaintenanceGuide · Designing with Black Granite: Tips and Inspiration forYour Home · The Natural and Unique Patterns of BlackGranite
External references: ASTM C615 Granite Standard · ASTM C503 Marble Standard
The seamless transition from interior floor to exterior patio in the same stone is the premium 2026 look. Specify the same material (honed indoor, flamed or riven outdoor) with a flush threshold — the visual continuity makes small spaces feel larger. Verify the interior stone is rated for exterior use or accept finish differences between zones.
Indoor-Outdoor Transitions
Define patio zones with contrasting stone borders — granite setts around a sandstone patio, or limestone coping around a pool. Borders add design structure at modest cost (linear meters are cheaper than full areas). Water features, fire pits, and outdoor kitchens benefit from stone surrounds that match the patio.
Stone Borders and Inlays
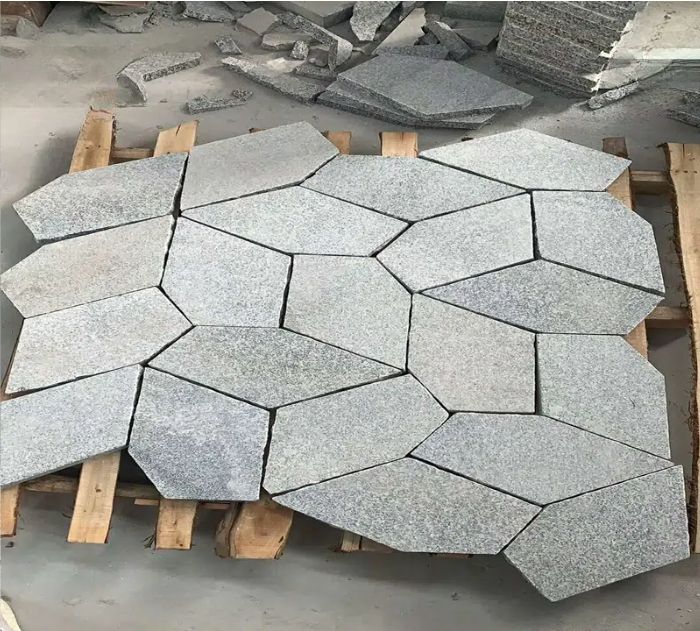
Irregular natural cleft pieces laid jigsaw-style create the most organic, garden-integrated look. Crazy paving suits cottage gardens and natural landscaping at the lowest material cost — offcuts and irregular pieces discount heavily. The trade-off: installation labor runs higher (each piece needs fitting), and the finished look is informal.
Crazy Paving for Organic Gardens
Slabs of 80×80cm and larger create a clean, seamless modern patio with minimal joints. Large-format stone reads as premium and photographs beautifully. The cost is higher (large slabs cost more per m² and need careful handling), and the base must be flawless — joints amplify any settlement.
Large-Format Slabs for Modern Patios
The current favorite: three or four rectangle sizes (60×60, 60×90, 60×120cm) composed in a repeating but non-obvious pattern. The layout creates visual movement without the busy look of random crazy paving. Specify mixed-size sets from one quarry batch for tonal consistency.
Mixed-Size Rectangle Layouts
Natural stone patios offer design possibilities manufactured pavers cannot match. The leading 2026 patio design directions:
Patio Design Ideas with Natural Stone
The rule of thumb: 22mm on mortar for patios; 30mm on sand for flexible patios and light driveways; 50mm for real vehicle traffic. The single most common paving failure — cracked pavers on driveways — comes from 22mm stone on an inadequate base, not from the stone itself. When in doubt, upgrade the base before upgrading the stone thickness.
| Thickness | Application | Base Required | Relative Cost |
|---|---|---|---|
| 20 - 22mm | Pedestrian paths, light patios | Full mortar bed or 100mm compacted hardcore + 25mm sand | Baseline |
| 30 - 32mm | Standard patios, driveways (with correct base) | 100-150mm compacted hardcore + 30mm sand, or mortar | +30 - 40% |
| 40 - 50mm | Driveways, commercial, public space | 150mm compacted hardcore minimum | +60 - 90% |
| 50mm+ setts/cubes | Heavy traffic, heritage streets | 150-200mm engineered base | +100%+ |
Thickness is the most misunderstood paving specification — thicker is not always better, and the correct choice depends on the application and base system:
Paving Stone Thickness: What to Choose
Material costs are a fraction of installed costs — base preparation and labor dominate the quote. The cost structure of a typical 500 sq ft patio: material $1,500-3,000, sub-base and sand $500-1,000, labor $3,500-7,000, edging and finishing $500-1,500. Total installed: $6,000-12,500 for 500 sq ft at $15-30/sq ft blended. For B2B buyers importing direct from China, FOB paving pricing runs $15-35/m² (sandstone, granite, basalt) — the material saving versus domestic yards reaches 30-50% before freight.
| Material | Material Only (per sq ft) | Installed (per sq ft) | Notes |
|---|---|---|---|
| Sandstone (Indian/Chinese) | $2 - $4 | $15 - $30 | Best value; natural cleft affordable |
| Limestone (French, Portuguese) | $4 - $8 | $20 - $40 | Elegant indoor-outdoor transition stone |
| Granite (G654, G682) | $4 - $7 | $18 - $40 | Most durable; flamed finish standard |
| Basalt | $3 - $6 | $18 - $38 | Dark uniform; freeze-thaw excellent |
| Slate | $3 - $6 | $15 - $30 | Riven texture; rustic look |
| Premium granite (Absolute Black, Blue Pearl) | $7 - $15 | $25 - $60 | Statement paving at premium |
| Porcelain pavers (comparison) | $3 - $8 | $15 - $40 | Synthetic; zero maintenance |
Stone paving pricing varies by material, finish, thickness, and source. The 2026 reference prices for planning budgets:
Natural Stone Paving Cost Guide 2026
The verdict: concrete pavers win on first cost and suit budget projects; porcelain suits low-maintenance modern designs; natural stone wins on longevity, value, and authenticity. Over a 30-year horizon — two concrete paver lifetimes — natural stone is the cost-effective choice as well as the beautiful one.
| Factor | Natural Stone | Concrete Pavers | Porcelain Pavers |
|---|---|---|---|
| Material | Quarried, 100% natural | Cement + aggregate | Fired clay composite |
| Lifespan | 50 - 100 years | 15 - 30 years | 20 - 40 years |
| Appearance | Unique, natural variation | Uniform, manufactured | Uniform, printed patterns |
| Slip resistance | Excellent (riven/flamed) | Good (textured) | Good (textured) |
| Maintenance | Low — seal occasionally | Moderate — joint weed control | Very low |
| Color stability | Permanent natural color | Fades over years | Permanent glaze |
| Cost (installed) | $15 - $40 / sq ft | $10 - $25 / sq ft | $15 - $40 / sq ft |
| Resale value | Adds property value | Neutral | Neutral |
Buyers choosing between stone and manufactured paving weigh durability, aesthetics, and cost:
Natural Stone vs Concrete and Porcelain Pavers
The longevity record: granite and sandstone paving from the 1800s is still in service across Europe and Asia. Properly based and drained, stone paving outlasts every manufactured alternative — the maintenance is a fraction of the value preserved.
- Cleaning: Sweep or blow debris regularly — grit grinds into the surface over years. Hose down monthly; use a mild stone cleaner for stains. Avoid pressure washing above 1500 PSI (strips sealer, erodes soft stone joints).
- Weed and moss control: Treat joints annually with a weed preventer or pull weeds before they seed. Moss in shaded areas: stone-safe biocide, not bleach (bleach damages surrounding plants and lightens stone).
- Sealing: Honed paving: reseal every 12-18 months. Natural cleft and flamed: sealing optional every 2-3 years — the textured surface resists staining naturally. Always seal in freeze-thaw climates.
- Repairs: Individual cracked pavers replace easily if spare stock was ordered (order 5-8% extra). Loose pavers re-bed on fresh mortar. Efflorescence (white powder on new paving) is cosmetic and fades within 6-12 months.
- Oil stains on driveways: Treat immediately with a poultice (baking soda paste, 24 hours under plastic). Sealed joints and prompt treatment prevent permanent driveways stains.
Natural stone paving is a 50-100 year investment with a modest maintenance routine:
Maintenance and Longevity of Stone Paving
Stone edging defines paving edges and prevents paver creep. Options: granite setts as a border course, purpose-cut kerbs (150×300mm and larger) for driveways, and natural cleft strips for garden beds. Edging cost is modest (linear meters) but the design impact is disproportionate — edges are what make paving read as intentional design rather than a floating surface.
Edging and Kerbs
Outdoor stone steps follow the same dimensional rules as interior stairs — riser height 100-180mm, tread depth 280-350mm, consistent risers. Outdoor specifics: flamed or bush-hammered finish for wet grip, 1-2% tread slope for drainage, 30-50mm tread thickness, and frost-resistant installation with concrete footings below frost line. Granite and basalt steps dominate; sandstone suits mild climates.
Steps and Stairs
Stepping stones on a grass or gravel bed create the most organic path. Stone options: granite slabs (300-600mm), basalt, sandstone, or slate pieces at 25-40mm thickness. Spacing rule: center-to-center distance of 600-700mm matches a natural stride. For frequent use, lay a continuous path of close-set stone; for occasional garden access, spaced steppers suffice.
Garden Paths
Beyond patios and driveways, paving details complete the landscape:
Walkways, Paths, and Steps: Paving Details
Two joint approaches: mortar joints (rigid — stone and base move as one; suits granite and basalt) and open sand-filled joints (flexible — allows drainage and movement; the modern permeable standard). Open joints with polymeric sand resist weed growth while staying permeable. For driveways, sealed joints prevent oil penetration into the base — oil-stained sand is a common driveway eyesore.
Joint Systems for Driveways
Vehicle-load paving fails through base failure, not stone failure. The engineered base: excavate 200-250mm, lay 150mm of compacted hardcore (50mm down to dust, compacted in two layers), then 40mm of sharp sand or a mortar bed. For clay soils, add a geotextile membrane and increase depth. The finished surface falls 1 in 60 minimum (1.7%) for drainage. Frost-climate driveways need the base below frost line at the edges, or the paving will heave regardless of stone quality.
The Driveway Base Specification
Granite is the default driveway stone — G654 and Absolute Black at 50mm thickness handle vehicle loads with durability measured in decades. Basalt 50mm+ matches granite performance at lower cost. Sandstone driveways work at 30-40mm only on perfect bases in mild climates; the softer stone chips under tire edge loads. Setts (100×100×100mm cubes) are the traditional driveway choice — they interlock through the base and handle the heaviest loads when laid on a proper mortar bed.
Stone Selection for Driveways
Driveways are the demanding application of stone paving — vehicles concentrate thousands of pounds on small contact patches, turning and braking apply shear forces, and the base must carry the load year-round through freeze-thaw. The driveway engineering guide:
Driveway Paving: Engineering for Vehicle Loads
Granite (water absorption below 0.3%) and basalt are the freeze-thaw champions — their density prevents water ingress, so freezing cannot crack them. Dense sandstone (absorption below 5%) performs well when sealed. Avoid limestone, travertine, and soft sandstone outdoors in frost climates. The base matters equally: pave on 150mm+ compacted hardcore with frost-protected edges to prevent heaving.
Which stone paving is best for freeze-thaw climates?
White powdery deposits on new paving are efflorescence — natural salts migrating to the surface as the mortar and base cure. It is cosmetic, not damage, and usually disappears within 6-12 months of weather exposure. Brush it off or use a specialized efflorescence cleaner. Persistent efflorescence signals drainage problems — water is moving salts continuously, so fix the drainage source rather than treating the surface.
Why is my new stone patio developing white patches?
Honed paving: yes, every 12-18 months. Natural cleft and flamed paving: optional — the textured surface resists staining naturally, though sealing in freeze-thaw climates is recommended. Sealing reduces moss growth, simplifies cleaning, and protects against frost damage. Use a solvent-based UV-resistant sealer for outdoor applications; water-based products break down faster in sunlight.
Do natural stone patios need sealing?
No — natural stone paving requires a compacted sub-base. Laying directly on soil leads to settlement, cracked pavers, and weed growth within the first year. The only exceptions: very light stepping stones on firm ground (300-600mm stones on sand beds) and dry-laid flagstones on established hard-packed ground in mild climates. For any real patio or path, excavate and compact a sub-base.
Can you lay natural stone paving on soil or grass?
Installed cost for a 500 sq ft patio: $7,500-15,000 depending on stone and complexity. Material $1,500-4,000 (sandstone cheapest, premium granite most), base preparation $1,000-2,000, labor $3,500-7,000, edging and finishing $500-1,500. The material is 20-30% of the total — base and labor dominate, which is why choosing quality installation matters more than shaving material cost.
How much does it cost to pave 500 square feet with natural stone?
Sandstone (beige or grey) is the best-value patio choice with warm natural tones; granite (G654 flamed) delivers maximum durability; limestone suits elegant indoor-outdoor transitions; basalt offers dark modern style. Choose by: climate (frost climates need dense granite/basalt), style (warm beige sandstone suits traditional gardens, grey granite modern homes), and budget (sandstone cheapest, premium granite most).
What is the best natural stone for a patio?
Paving FAQ: Extended Answers
DIY assessment: patios up to 500 sq ft are achievable for competent DIYers on a full weekend per 100 sq ft of laying pace. Driveways and anything on clay soil or frost climates warrant professional installation — the base engineering separates successful paving from expensive rework.
- Design and layout planning: Sketch the paved area, choose the pattern, calculate quantity (add 5-8% for cuts and waste), and mark the area with string lines. Confirm drainage falls before any excavation.
- Excavation: Excavate to the design depth — typically 150-200mm for pedestrian areas, 200-250mm for driveways. Remove all organic soil; the base must sit on firm ground.
- Sub-base compaction: Lay and compact hardcore in two layers (100mm + 50mm for driveways), using a plate compactor. The sub-base is the load-bearing element — compaction quality determines paving longevity.
- Screed layer: For sand-laid paving, screed 25-40mm of sharp sand to a level surface (use screed rails). For mortar-laid paving, mix 1:4 mortar and lay a full bed — never spot-bed paving stone.
- Stone laying: Lay stone from a corner, working outward. Tap each paver level with a rubber mallet; check with a spirit level every course. Maintain consistent joint widths with spacers.
- Cutting: Cut edge pieces with an angle grinder and diamond blade (wet cutting recommended) or a stone saw. Wear dust protection — stone dust is hazardous.
- Joint filling: Sand-laid: sweep kiln-dried sand or polymeric sand into joints and compact. Mortar joints: fill with 1:4 mortar, tool to the surface, and keep moist for 3 days curing.
- Compaction and finishing: Plate-compact the finished surface (with a protective mat for natural cleft stone), sweep clean, and seal if specified. Keep traffic off for 24-48 hours (mortar joints: 7 days).
Whether DIY or contractor-installed, understanding the installation sequence protects you from the failures that shorten paving life. The complete process:
Paving Installation: Step-by-Step Guide
For LEED and BREEAM projects, natural stone paving contributes to stormwater management credits, materials disclosure credits (stone has published Environmental Product Declarations), and heat-island reduction. The sustainability case for stone strengthens every year as embodied-carbon accounting matures.
- Permeability: Open-jointed stone paving allows rainwater to recharge groundwater — a key advantage over impervious concrete and asphalt. Permeable stone paving helps projects earn stormwater management credits and reduces flooding in urban areas.
- Low embodied carbon: Stone is quarried and cut — no kiln firing (versus concrete and porcelain), no chemical binders (versus concrete). Transport is the main carbon cost, which is why locally sourced stone and sea freight (lowest carbon per tonne-mile) minimize footprint.
- Longevity = fewer replacements: A 50-100 year stone surface replaces 2-3 generations of concrete or asphalt. The manufacturing avoided over the surface life dwarfs the initial footprint difference.
- Recyclability: Stone removed at end of life crushes into aggregate or re-sells as reclaimed material. There is no stone waste stream equivalent to concrete rubble or fired-clay scrap.
- Cooling benefit: Light-toned stone reflects solar heat, reducing the urban heat-island effect versus dark asphalt. Stone patios and driveways stay cooler in summer — measurable comfort and energy benefits.
Natural stone paving carries genuine environmental advantages that increasingly influence specification:
Natural Stone Paving: Sustainability and Environmental Benefits
Three winters later, the report: zero cracks, zero heaving, and the driveway handles the family snowplow without issue. The homeowner notes the granite surface sheds snow faster than the previous asphalt (dark stone absorbs heat) and the bluestone patio requires only spring and fall cleaning. The single maintenance item: resealing the bluestone every 18 months. The project confirms the guide principles — the base engineering and drainage carried the project; the stone choice delivered the 50-year surface.
The procurement: the granite arrived as a direct import from a Chinese processor at $28/m² FOB — roughly half the local yard price — with 30mm and 50mm calibration verified against the packing list. The bluestone was sourced regionally (US Northeast) at a $4.50/sq ft premium over imported stone, chosen for its authentic local character. Installation ran six weeks with a three-person crew: two weeks base preparation and drainage, three weeks laying, one week jointing and finishing. Total project cost: $24,500 — 65% labor and base, 25% material, 10% edging and drainage.
A Massachusetts homeowner project illustrates the full natural stone paving process. The scope: a 900 sq ft driveway (vehicle access to a detached garage) plus a 650 sq ft bluestone patio connecting the house to a new pool. The driveway specification: 50mm flamed granite (G654) laid on 200mm compacted hardcore with polymeric sand joints and granite setts as a border course. The patio: 30mm bluestone in a mixed-size pattern on a mortar bed with a 1.5% drainage fall.
Case Study: Natural Stone Driveway and Patio Project
Frequently Asked Questions
What should I know about why natural stone paving??
The "Why Natural Stone Paving?" section above covers this topic in detail with specifications and practical guidance for B2B stone buyers.
What should I know about best stone for paving?
The "Best Stone for Paving" section above covers this topic in detail with specifications and practical guidance for B2B stone buyers.
What should I know about patio design ideas?
The "Patio Design Ideas" section above covers this topic in detail with specifications and practical guidance for B2B stone buyers.
What should I know about driveway paving guide?
The "Driveway Paving Guide" section above covers this topic in detail with specifications and practical guidance for B2B stone buyers.